This is a great tutorial for new users. In this tutorial we will look at different methods to start a new project, such as using a custom template, the screenshot tool, or inserting your own settings. Also we will look at different methods to open an image, how to save images to Gimp's native .XCF format. Then we will demonstrate how to export images to jpg or png format.
If you would like to have a more in-depth explanation, you can watch the video above.
Images by MIKHAIL VASILYEV Unsplash
Step 1

- Come up to the File menu and select New.
Step 2

- In the dialog in you can choose from one of the predefined templates available in Gimp or make your own settings for the new image.
Step 3
Let's go to the Templates First
- If you scroll down the menu you'll find templates for different page sizes, business cards, etc. with a high resolution of 300 pixels per inch for printing.
- However web banners, screens sizes, are set to 72 pixels per inch which is sufficient for most Web page graphics.
- Tablets and telephone templates all have different resolutions, so you'll have to check them individually.
Step 4

Come back to Create A New Image dialog.
- You can set the size for the image, by typing in the width and height.
- By default Gimp is set to pixels, however, you can use a different unit setup, such as to inches, millimetres, centimetres etc.
- You can change the page orientation. There are two buttons to toggle between Portrait and Landscape mode.
- Next open the Advanced Options,
- Here you can modify the resolution, Colour space, Precision, Gamma, Colour profile, Fill With, and Comment.
Step 5
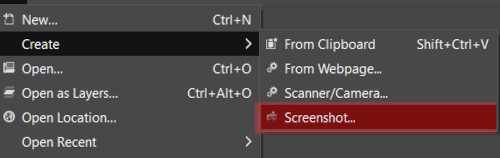
There are other methods for creating new projects, come back to the file menu and let's look at Create
- You can start a new project from an image you have saved on your clipboard, or from a webpage, scanner/camera, and screenshot.
Step 6

Let's checkout the screenshot tool. In the dialog you have options to take a screen shot of a single window, or an entire screen.
- If you only have one screen, then, just click Snap and the image is automatically loaded on the canvas.
- However if you are using two or more screens, select screenshot of a single window. And click Snap
- Now an other dialog pops up, just drag the + icon to the screen that you want to capture and the image is loaded on the canvas
Step 7
Next, let's look at how to open an image.

There are a number of methods to do this, so feel free the to use the option you find most comfortable or convenient depending on the devises you are using.
First let's just click on Open.
- In the dialog you can naviagte to the folder where your image is saved.
- You can type in the name in the Search box
- You can go to Resently Used
- And you can have your folder bookmarked for a quick access. The bookmarks are situated on the left in the Places menu.
Step 8

- Before Opening the image you will see a Preview image on the right side, just above the Open button.
- On occasions a dialog might appear, - Import the image from a colour profile
- Click on Convert, and this will convert the image to Gimp's RGB colour profile.
You can select multiple images, by holding down the Ctrl or Shift key while selecting the images, and click Open and they will all open as separate images in Gimp.
You can also drag and drop images from your file explorer, or just right click on the title of an image, and select Open with GIMP
You can also Open As Layer, and this will open and image as a new layer on the active image stack.
Step 9

Let's look at saving images.
Save As
- Choose the folder you want to save the image in first.
- Type in the title of the image, and save.
The image will be saved in Gimp's native format .XCF file format.
This file format saves all image data, including layers, channels, paths, transparency etc., so you can continue where you left of at a later date, without having to restart the project again.
Save
- When you begin a new project or modify the active one, it's very important that you frequently save your work as you go.
Save Copy
- Saving copies of XCF files at different stages of a project, is a good practise to get into, not only as a backup but so you can go back to these files and carry on editing or make other variations of your work.
Step 10

To export an image, use Export As.
- In the export image dialog choose the file you want to save your work in
- Type in the title of the image and the file format you want.
- Or you can click on the Select Image Type button and can scroll down the menu and select the file format you want.
GIMP can export to a large number of formats, however some of the most common file formats are: JPeG, PNG and GIF
Wrap Up
We'll wrap up here.
You can watch the video for a more detailed version.
Saving And Exporting Images In Gimp
If you want to carry on learning more about Gimp, then watch the next video in this beginners series.
ENJOY!