This is a quick and easy, step-by-step tutorial. In this tutorial we will change the colour of the cat's eye, however you can use the same technique for colouring human eyes, and actually nearly everything. Its very easy to do, so once you learn this process you could practise colourising on your own images.
We will be using the Healing Tool, the Paths Tool, and finally we will paint the eye using the LCH Colour Mode.
If you would like to have a more in-depth explanation on how to achieve this effect, you can watch the video above.
To Follow along with the tutorial/video, you can download the image from here. Enjoy!
Image by ZERO XIE from Pixabay
Step 1

- Come up to the File menu and select Open.
- Navigate through your system to where your image is saved, and hit Open
Step 2
Now we need to zoom in really close to get a good look at the eyes. To do this, hold the Ctrl key and roll the middle mouse button. And to pan the image from side to side, hold the middle mouse button and move the mouse.
Step 3

- We need to make a copy of the original image, so drop down to the menu below the layers panel and hit the Create Duplicate Layer button.
- Next double click on the title and change the name, I'll keep it simple and change it to Green eye .
Step 4

This option doesn't have to be perfect, just a light touch up, as it won't be that noticeable. In the pupil there is a reflection of what the cat could see at the time the photo was taken, so we want to preserve that as much as possible.
- Come over to the tools box and grab the Healing tool. It is in the submenu of the Clone tool.
- Drop down to the settings and select a small soft brush, a 2 with a hardness of 025 to start with.
- You have to try different brushes sizes, I'll start with something small size of about 15 or 20... and increase and decrease the size when needed.
- Place the mouse pointer near the hair and the Hold the Ctrl key and click on the blue part of the eye, this will take a sample, next release the Ctrl key and click on the area you want to cover.
- When you are finished, select the Move tool to dis-activate the Healing tool
Step 5

- Come over to the toolbox and select the Paths tool
- Place 4 nodes to start, just click to leave a node with out any dragging.
- When you get back to the the first point, you will see it has and empty circular point, hold the control key and click on top to close the path.
- Next hold the Ctrl key and click to add a new node in the middle of the segment, and move the curve to the edge of the eye.
Step 6
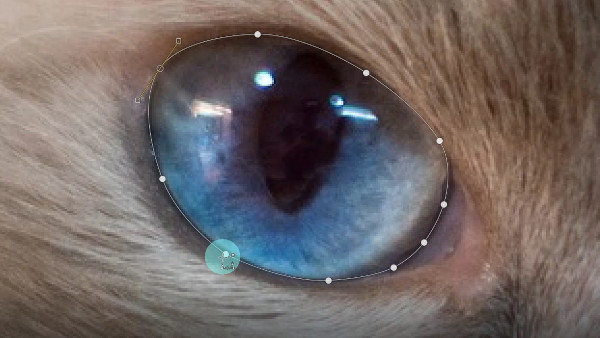
- If you are not happy with the form of a curve shape or a segment you can delete a node by holding Ctrl + Shift and clicking on the node you want to remove, then create a new node in it's place.
- Come over to the settings and select Selection From Path
Now the selection is displayed by moving dots.
Step 7
Next we need to create a new layer for the selection on. Come over to the layers panel and select Create New Layer

- Come over to the layers panel and select the Create A New Layer button.
Step 8

- In the dialog, change the name to Colour Green, and keep all the default settings.
- Very important: Set Fill With to Transparency, and hit OK
- Before moving on, select the Move tool to to dis-activate the Paths tool.
Step 9
Next come up to the Select menu and select the Feather tool, this tool will feather the edges of the selection area and create a smooth transition between the selection and its surroundings.

- In the dialog, set to 5 px and hit OK.
Step 10
Now we can start to paint the eye, select the painbrush, use the same small, soft brush as before.
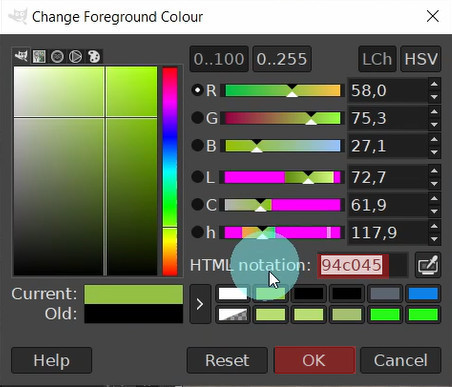
- Open the foreground colour, and copy the html notation 94C045 then hit OK.
Step 11

- Come over to the layers panel and in Mode, scroll right down to the end of the menu and select LCH Colour. LCH, stands for Lightness, Chroma and Hue.
Step 12
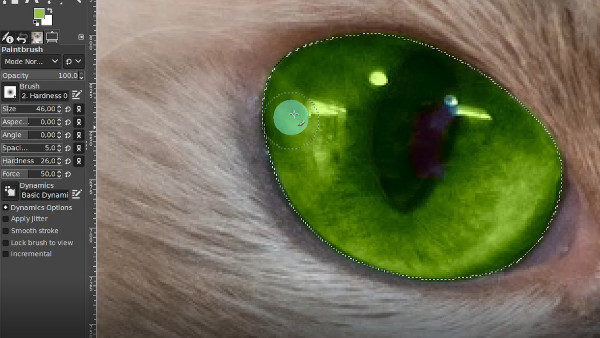
- Now you can start to paint the eye, try not to paint over the pupil, if you do we will clean it in the next step.
Step 13

- When you have finished painting, grab the Erase tool. Change the size of the brush, and remove any green paint from inside the pupil, so the reflection is clear and bright.
Step 14
Before finishing, we can touch up the white reflections in the eye, we will use a very small soft brush and white paint.
Create a new layer, keep Transparency.
Step 15
Before we can paint, we have to deselect the moving ants around the selection, so come up to the Select menu and select NONE

- Next go over to the foreground colour, and select white, or just copy the html notation for:FFFFFF and hit OK.
- Zoom in more, so you have a good close up of the eye.
- Use a very small soft brush and paint over the very small white reflections
- If you like, you can lower the Opacity on that layer to about 80-85
Export Image
We'll wrap up here. You can export your image, to do this go to the File menu, select Export As, and export as a .jpg or .png. file format.
You can watch the video for a more detailed version.
How To Colour Eyes In Gimp 2.10.22
If you want to carry on learning more about Gimp, then watch the next video in this beginners series.
ENJOY!